Clone Care Sheet:
Receiving and Acclimating Rooted Clones for Transplant
Purpose:
This summary outlines the procedures for receiving, inspecting, and acclimating rooted clones before transplanting them into their final growing medium and environment. Following these steps ensures optimal plant health, minimizes transplant shock, and prevents pest/pathogen introduction.
Scope:
This procedure applies to all incoming shipments of rooted clones sent by Clone2U
Materials & Equipment:
- Clean nitrile gloves
- Sterile scissors or pruning shears
- pH and EC Meter (Handheld or Mounted)
- Infrared thermometer
- Humidity dome, Bag, or Grow Tent (if needed)
- Air-filtered Quarantine space (if available like grow tent)
- Sticky Trap Card from Catchmaster in Goodie Bags
- Plant Tag – Dual Action – Sticky Trap from Catchmaster in Goodie Bags
- Permanent Marker – Label Strain on Plant Tag
- Roost Boost Inoculation Powders from XtremeGardening in Goodie Bags (Mykos – Azos – Versity)
- Hand lens loupe or digital microscope (30x–100x)
- Bleach Solution (20%) = 200ml Bleach & 800 ml H20
- Spray bottle or misting / fogger system
- R.O. filtered or distilled water pH-balanced @ 5.8–6.0 ph
- Mild nutrient solution (EC 0.6–0.8) or (420 to 560 ppm) like Athena Ag Grow
- Integrated pest management (IPM) solutions from BioSafe Systems, or similar compatible products to treat canopy and root drench. (Zerotol – Azaguard)
Click Here For Equipment Checklist
(Disclaimer: As an affiliate of partners above I earn from qualifying purchases and we appreciate your support in choosing to order through these links as it helps fund the complimentary educational efforts we promote on platforms.)
Procedure
- Receiving & Initial Inspection:
Unpacking Clones from Clone2U
- Open the shipment in a clean, isolated workspace.
- Wear gloves to prevent contamination.
- Remove clones carefully to avoid damage to foliage and roots.
- Visual Inspection:
- Check for signs of pests, mold, mildew, or damage.
- Inspect leaves for discoloration, wilting, or necrotic spots.
- Use a hand lens/microscope to check for microscopic pests (e.g., russet mites, broad mites, thrips).
- Examine root systems for healthy white roots without rot or foul odors.
- Environmental Preparation:
- Ensure your nursery space or grow room is ready with 75*-80* temperature and ability to put clones in a spot that has 70-80% Humidity for the first 48-72 hrs, then lessen the RH% to match your preferred Veg phase parameters before transplanting. (This aids in acclimation from our nursery and transport temperature differentials.)
- Use a small grow tent, or humidity dome; fully vented & elevated above the propagation tray to allow air flow, but still maintain a higher humidity for acclimation.
- Alternatively use an open ziploc bag gently placed on top single clones in a cup or container to aid in high humidity without blocking light or too much air flow.
- Pro Tip: Use a hygrometer with wired sensor to monitor the Temp & RH% inside the dome or bag. Alternatively use these micro hygrometers for even smaller tight spaces.
- Immediate Actions:
- If clones show pest or disease signs, isolate and treat accordingly. Take photos and email to us at contact@clone2u.com for next steps to replace, or assist with treatment plans to contain and eradicate.
- If clones are severely damaged for any reason, take photos and email to us at contact@clone2u.com for replacements
- If roots are dry upon arrival, mist lightly with pH-balanced water or use mild veg nutrient outlined above.
- Quarantine & Acclimation
- Quarantine (5-7 Days Recommended):
- Place clones in a separate, Air-filtered Quarantine area. (Like Grow Tent)
- Maintain moderate conditions (Temperature: 75*-80*F, Humidity: 65%–80%).
- Hang sticky trap cards on a table near the root zone or hang onto plant arms once 12”+ tall to monitor for any hidden pests. Use the Plant Name Tag- Dual Action -Sticky Card when first transplanting or holding in quarantine for pest prevention and scouting.
- Avoid placing new clones directly in the main growroom.
- Gradual Environmental Adjustment:
- The rooted clones will arrive from a high-humidity environment (domes, plant shippers, plastic bags), slowly expose them to lower humidity over 48–72 hours.
- Adjust grow room temp & RH% conditions to match Clone2U nursery conditions mentioned above, gradually.
- First Watering:
- Use a mild veg phase nutrient solution (EC 1.0 – 1.5, pH 5.8–6.0)
- Ensure an even, but light watering of clones before transplant day —avoid waterlogging.
- IPM Preventative Measures:
- Apply (with lights off) organic foliar spray /dunk (neem oil, insecticidal soap, or botanical extracts) as a preventative measure. Check our IPM section of product lists HERE.
-We also rotate products like Azaguard or Zerotol (H2020) from BioSafe Systems, if want to continue similar program see their full list HERE
- Introduce beneficial insects (e.g., predatory mites, rove beetles, predatory wasps, nematodes, or lacewings for thrips, aphid, and spider mite prevention)
- Place the Plant Tag – Dual Action – Sticky Card on the Clone media and transfer it when you transplant to larger media for strain tracking and pest scouting from day one.
- Hardening Off for Transplant
- Gradual Light Exposure:
- Your rooted clones were previously grown under LEDs low lighting (200-300 ppfd) – To acclimate, start with indirect light or 50% intensity grow lights to match that PPFD if you have a PAR Meter or grab one to assist in optimization.
- Increase light intensity over 3–5 days to prevent photostress. Adjust up to 400-600 ppfd during the veg cycle and then go into flower phase ramping up to 800-100 ppfd. If you see light bleaching on top of plants or burning, turn down light intensity or raise them up.
- Temperature & Humidity Adjustment:
- Lower humidity gradually from 65%-80% during acclimation, to match the grow room environment (55-65%).
- Maintain temperatures around 75–80°F. (Higher temps fine if using C02 injection)
Pro Tip: Use Pulse One remote monitors connected to your phones app to monitor temps & RH% anytime and recall back as a log for better or worse experiences and optimize. (For Co2 Monitoring as well grab the Pulse One Pro)
- Root Strengthening:
- Water with a slightly stronger veg nutrient solution (EC 1.5 – 2.0, 5.8 – 6.0 pH)
- Ensure proper drainage to prevent root rot. Mediums like coco / perlite or rockwool are best for faster dry-backs.
Pro Tip: Focus on dry-backs allowing roots to seek water rather than drowning in excess water. Once transplanted in larger media, get a moisture meter to measure water content or use Trolmaster type setup for advanced monitoring and irrigation control.
- Final Pest & Disease Check:
- Conduct another thorough inspection for pests or mold before transplanting.
- Remove any clones showing persistent issues. Email contact@clone2u.com for any issues or concerns.
- Transplant Preparation
- Choosing the Right Medium:
- Ensure the growing medium is pre-moistened but not soggy.
- Mix Root Boost kit into water nutrient solution from Xtreme Gardening to aid transplant resilience & immunity. (This will also boost root growth and drought tolerance.) Dose at rate on sample baggies.
- If using hydroponics, ensure proper EC and pH balance in the system.
- Transplanting:
- Wear clean gloves. Handle clones gently to avoid root damage.
- Transplant at the correct depth—bury stems only slightly beyond existing root level.
- Water immediately after transplanting with a veg nutrient solution (EC 2.0 – 2.5, 5.8 – 6.0 pH)
- Post-Transplant Care:
- Keep light intensity moderate for the first 24–48 hours.
- Monitor for signs of transplant shock (wilting, yellowing, or drooping).
- Resume standard nutrient irrigation schedules once plants show new growth and are drinking the water. Otherwise maintain or increase light intensity to assist in dry-backs, then water once light weight when lifted.
Pro Tip: Water once only, when first transplanted and wait for them to dry back until the top of the media is dry. Lift the container or cube daily to learn once it’s too light weight and needs watering, before droops or wilts, which is not desired. If overwatered then use a light nutrient foliar spray to keep them fed but not add anymore water until the medium dries back. (Always apply foliars with lights OFF)
- Quality Control & Record Keeping
- Track Clone Performance: Log strain, qty, date received, nutrients / IPM used, and any issues noted. Take photos weekly to log progress visually.
- Monitor Survival Rate: Track clone health and survival post-transplant to assess processes and troubleshoot with us contact@clone2u.com
- Improve Processes: Adjust acclimation procedures based on observed clone performance. Similar with watering processes or media selections. Better inputs = better results.
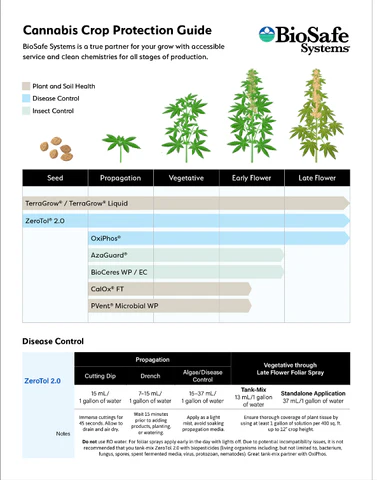
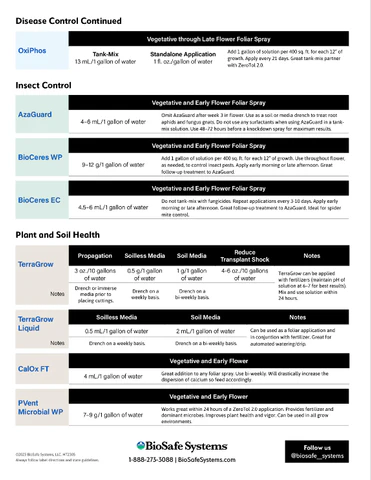
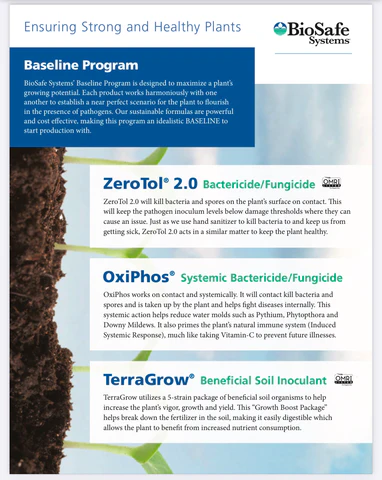
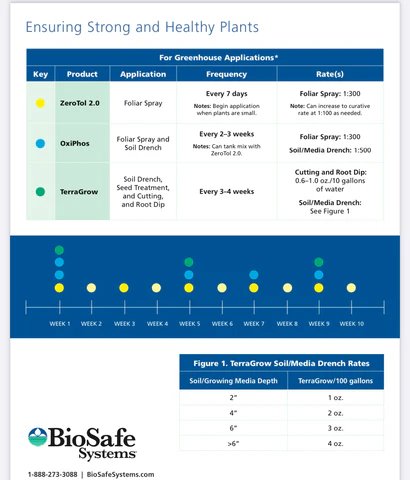
For preventative and curative programs against fusarium, pythium, and pests, we HIGHly recommend the BioSafe IPM program below. These products may, or may not be available at local speciality stores, however you can buy online or contact our favorite rep directly here BioSafe Dusty
For other Frequently Asked Questions check out our FAQs Here
For Google Drive Copy & Printable Version of this Page Click Here